
티스토리 뷰

이제 drag & drop 기능을 추가해 줄 것이다.
여기서는 패키지를 불러와서 기능을 추가해 줄 것인데 일단 설치해줘야 할것은
| npm i react-beautiful-dnd |
이놈이다.
이놈은 DragandDropContext 와 Draggable, Droppable 이 세가지를 지정해줘야 하는 모양이다.
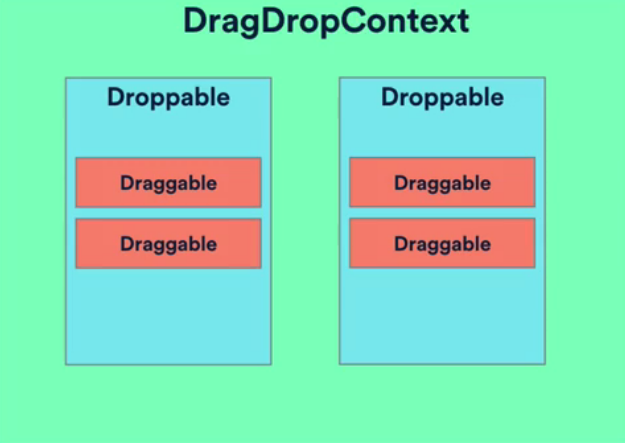
우선 App.js가 DragDropContext가 될 것이다.
import { DragDropContext } from 'react-beautiful-dnd'임폴트 해주고
컴포넌트 안에 드래그가 끝나면 무슨일을 할껀지를 정의하는 함수를 하나 추가해준다음에
const onDragEnd = () => {
		//드래그 끝나면 할일
	}
DragDropContext 로 기존에 있던놈들을 한번 감싸준다.
//props로 onDragEnd 함수를 넣어준다. 드래그가 끝나면 이 함수가 실행될것
<DragDropContext onDragEnd={onDragEnd}>
    <div className="App">
        <h2>Hello</h2>
        <div style={styles.listsContainer}>
             {lists.map(({title, cards}, id) => (
               <TrelloList listID={id} key={id} title={title} cards={cards} />
                    ))}
               <TrelloActionButton list />
        </div>
    </div>
</DragDropContext>
이제 Droppable 을 지정해주자. 이놈은 TrelloList.js 다.
임폴트 해주고
import { Droppable } from 'react-beautiful-dnd'
그리고 지정된 서식대로 맞춰 넣어준다
return (
//index id 에 대한 에러가 발생할때는 droppableId 가 문자열로 들어가고있는지 확인해 본다.
<Droppable droppableId={String(listID)}>

//이전에 있던놈들을 provided 의 return 안에 넣어준다
	{provided => (

    //div 안에 아래의 것들을 넣어주는데 이에대한 내용은 공식페이지가서 확인하라는데
    그렇게까진 하고싶지 않았다. 그냥 맞춰 넣어주자.
		<div {...provided.droppableProps} ref={provided.innerRef} style={style.container}>
			<h4>{title}</h4>

            //카드가 Drop될때 순서가 바뀌므로 id와 index번호가 필요하다. 그러니 넣어준다.
			{cards.map(({id, text}, index) => (
				<TrelloCard key={id} text={text} index={index} id={id}/>
			))}
			<TrelloActionButton listID={listID} />

            //끝은 이렇게 내준다.
			{provided.placeholder}
		</div>
	)}
</Droppable>
);
이제 TrelloCard 로 넘어간다.
역시 임폴트해주고,
import { Draggable } from 'react-beautiful-dnd'아래처럼 세팅해준다. 티스토리 코드블럭이 미쳤는지 정렬이 자꾸 깨진다.. 감안해서 봐야할듯..
//아까 넘겨받은 id와 index를 받아주고,
const TrelloCard = ({ text, id, index }) => {
	return (
    	//이전코드를 Draggable 컨테이너로 감싸준뒤 마찬가지로 id와 index 번호를 준다.
		<Draggable draggableId={String(id)} index={index}>

        	//또 provided 의 return 에 기존코드를 넣어주고
			{provided => (

            //div 를 새로 만들어 card 컴포넌트를 감싸준다. ref 는 Dom node 에만 넣어줄수 있다나..
            //이것저것 기본 세팅을 해준다. 그리고 dragHandleProps 는 드래그가 가능한 위치를 지정해주는
            //것 이라고 한다.(쉽게말하면 마우스커서로 어디를 집어야 하는지를 지정)
			<div ref={provided.innerRef} {...provided.draggableProps} {...provided.dragHandleProps}>
			<Card style={styles.cardContainer}>
					<CardContent>
						<Typography gutterBottom>{text}</Typography>
					</CardContent>
				</Card>
			</div>
			)}
		</Draggable>
	);
};
이렇게까지 하고 드래그해보면 되긴된다.
하지만 첫번째 카드를 드래그하면 다른 리스트보드의 같은 위치에있는 카드들까지 움직인다.
이게 ID가 겹치는 문제때문에 그런다고 한다.
해서 listReducer 에가서 id들을 수정해줘야한다.
  {
    title: "last Episode",
    id: `list-${0}`, //백틱으로 감싸서 넣어주고 list와 card를 구분해준다. 또,
    cards: [
      { id: `card-${0}`, text: "we created a static list and a static card" },
      { id: `card-${1}`, text: "we used a mix between material" }
      //card는 위처럼 그냥 리스트와 상관없이 순서대로 이어지게 만든다.
    ]
  },
  {
    title: "this Episode",
    id: `list-${1}`,
    cards: [
      { id: `card-${2}`, text: "Hi" },
      { id: `card-${3}`, text: "eat kimchi" },
      { id: `card-${4}`, text: "what?" },
      { id: `card-${5}`, text: "wtf" }
    ]
  }
];
이렇게 수정했으니 리듀서 부분도 수정해준다.
    case CONSTANTS.ADD_LIST:
      const newList = {
        title: action.payload,
        cards: [],
        id: `list-${listID}` //여기랑
      };
      listID += 1
      return [...state, newList];

    case CONSTANTS.ADD_CARD:
      const newCard = {
        text: action.payload.text,
        id: `card-${cardID}`, //여기

      }
      cardID += 1
이렇게까지 하고나면 정상적으로 겹치지않고 작동하게 된다.
다만 이제 순서가 바뀌고나서, 즉 드랍까지 끝나고나면 원래의 자리로 다시 돌아오게되는데
이문제는 다음 시간에...
**이건 그냥 패키지를 가져다가 쓴것이기때문에 약간 정해진부분이 있고 그 설정에 맞춰서
끼워 넣어주기만 하면 됐던거라 특별한 뭔가는 없었다.
'REACT STUDY' 카테고리의 다른 글
| [Trello 만들기 4일차 1]카드 추가기능 (0) | 2020.01.03 |
|---|---|
| [Trello 만들기 3일차]List 의 추가 (action, dispatch(Hook에서 사용)) (0) | 2020.01.03 |
| [Trello 만들기 2일차] 카드 추가버튼 만들기 (0) | 2020.01.01 |
| [Trello 만들기]1일차 - 보드와 카드 만들기 (1) | 2019.12.31 |